SilverState55: Custom & Collectible Football Helmets & Minihelmets


HELMET CRACK REPAIR
Helmet Refurbishing FAQs Helmet Refurbishing Tips & Tricks
 
**NOTE: This information is provided solely for private collection purposes ONLY.  THIS SITE DOES NOT SELL REFURBISHED FOOTBALL HELMETS, USED FOOTBALL HELMETS, NOR DO WE RECONDITION FOOTBALL HELMETS.  If you need football helmets reconditioned, please contact your appropriate supplier or manufacturer's representative**


SilverState55.com assumes NO liability for incorrect use of any football helmet.  All helmets subject to the steps listed below are for DISPLAY PURPOSES ONLY.  DO NOT USE ANY FOOTBALL HELMET FOR ANY OTHER PURPOSE(S) THAN DISPLAY IF YOU SUBJECT IT TO THESE INSTRUCTIONS.  Read and follow any written instructions that accompany any helmet before using.


Helmet not repairable? Need a new helmet?
Free Shipping on all orders over $99 FootballAmerica.com


Football Helmet Crack Repair (by Bryan Nelson)


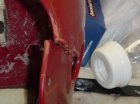
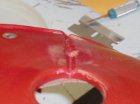
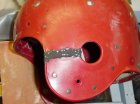
STEP 1:  This helmet is seriously cracked & damaged.  You may find a great deal on a classic or hard-to-find vintage helmet, only to discover it in a condition such as this.  Fear not, but read on, so you may repair cracks & splits such as this and restore your helmet to almost-new condition for display purposes only.


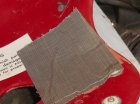
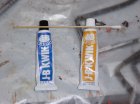
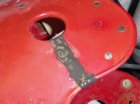
STEP 2:  Good preparation is essential for any successful repair work.  Thoroughly clean and sand the area to be repaired.  Then, stabilize the area to be repaired by placing a piece of duct tape on the backside (rear), to keep it from moving around.


STEP 3: File or sand a groove in the crack, to ensure maximum penetration of the bonding agent (for all you welders out there, you'll be able to appreciate this).


STEP 4:  The bonding agent being used here is J-B Kwik Weld.  If you have a preferred cement or bonding agent, then by all means use it instead.  J-B makes several strong bonding & filling agents that have been used in automotive repair applications for many years, and J-B products are widely available.


STEP 5:  Apply the bonding/filling agent across and into the groove from Step 3.  The tape you applied in Step 2 will help keep the area rigid while the bonding agent cures.


STEP 6:  Allow the bond to fully harden and cure.  Then, sand & file to your heart's content!  Notice that the bond will have to be painted to match the color of the helmet; most likely, the whole helmet will have to be painted.  This will offer the best method of covering the repair from view.  Once you're all done painting, remove the tape from the backside and you're all set!