SilverState55: Custom & Collectible Football Helmets & Minihelmets


Display Helmet Refurbishing, Step 3: Sand and Fill
Back to Step 2 FAQ Helmets
 
**NOTE: This information is provided solely for private collection purposes ONLY.  THIS SITE DOES NOT SELL REFURBISHED FOOTBALL HELMETS, USED FOOTBALL HELMETS, NOR DO WE RECONDITION FOOTBALL HELMETS.  If you need football helmets reconditioned, please contact your appropriate supplier or manufacturer's representative**


SilverState55.com assumes NO liability for incorrect use of any football helmet.  All helmets subject to the steps listed below are for DISPLAY PURPOSES ONLY.  DO NOT USE ANY FOOTBALL HELMET FOR ANY OTHER PURPOSE(S) THAN DISPLAY IF YOU SUBJECT IT TO THESE INSTRUCTIONS.  Read and follow any written instructions that accompany any helmet before using.

Rather buy a new football helmet instead?
Free Shipping on all orders over $99 FootballAmerica.com

Sanding


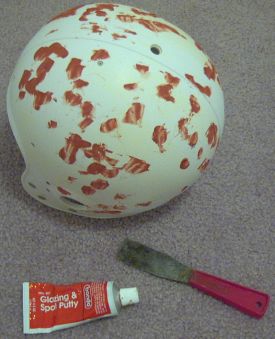
To reduce or eliminate the aggravating dust generated by dry sanding, I wet sand almost exclusively.  Be sure to use Wet-and-Dry (or similar waterproof brands of sandpaper, such as Emery Paper or others) and a bowl of tap water.  I start with a rough 240-grit as this will remove lots of paint and burrs in a hurry.  But it will also leave scratches of its own, so I follow on with some 320-grit and finish up with 400-grit to remove most scratches left by earlier sanding and filing.  Be careful and go slowly, ensuring that you are not removing too much material and creating any flat spots.  Once done, rinse the shell thoroughly to remove any sanding residue, and set it aside to dry.


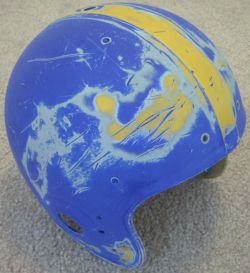
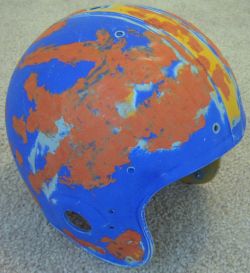
If your shell has been previously painted, you'll notice that this paint is filling some scratches; leave it there, as that means less work for you.  Priming at a later stage is going to do the same for you.


Filling


I like to use Bondo Glazing and Spot Putty; it sticks to anything, dries fast, wet-sands easily, and is widely available.  However, it contains several hazardous and potentially toxic chemicals, so of course don't breathe the fumes (make sure you have adequate ventilation) and try not to get it all over your skin.  I apply it directly to the shell, then use a small putty knife to push the putty into the deeper scratches and gouges.  The putty is only workable for about 30 seconds, so apply to a few spots at a time, and clean your putty knife off on a paper towel after each use.  Then apply to another spot area and continue.


Compare this photo with the one above.  Putty has been applied to fill major scratches and defects, but not every single little scratch; the smaller scratches can be filled when you prime the shell. The putty will dry in about 30 minutes (depending upon your climate; humid, damp, and cold environments will take longer to dry/cure).  Once dry, wet-sand as you did earlier, and reapply putty to any areas that need it.  Keep repeating this puttying/sanding process as many times as needed until you have a fairly smooth surface that you are happy with.

On to Step 4